This article is dedicated to:
- what kinds of surface defects are the most frequent in rails and can lead to their breakage;
- which testing techniques are applied for detection of the same; analysis of effectiveness;
- what kind of NDT equipment allows to most accurately detect the described rail defects.
Optimisation of detection of the surface fatigue defects in the rail track
This article is dedicated to:
- what kinds of surface defects are the most frequent in rails and can lead to their breakage;
- which testing techniques are applied for detection of the same; analysis of effectiveness;
- what kind of NDT equipment allows to most accurately detect the described rail defects.
-
Introduction
In order to guarantee safe exploitation of the rails, NDT inspection methods are applied for the damages detection on the rails. The first thing among them is ultrasonic rail testing. Nowadays, the loading on track is constantly increasing due to the general traffic increment and use of high-speed trains. Rail damages increasingly occur on the rail head running surface as a result of rolling contact fatigue–RCF. These damages are the most dangerous during the track service as this may result in transverse cracks development and cause rail breakage.
With regard to implementation of compatibility of the European rail systems, the railway infrastructure managers shall pursue a plan for each rail line servicing. This plan also includes ultrasonic testing of railway track for the surface flaws testing and evaluation, caused by RCF (rolling fatigue).
There are two main RCF types: «Squats» and “Head Checking”–further HC. These surface rail defects have significant differences between them with regards to the mechanism of their development and growth. «Squat»-type defects represent a complex process of interaction «Wheel-Rail», and appear during micro-sliding of a wheel, that in turn launches the mechanism of plastic deformation of the rail head running surface. This type of defects is similar to the «Wheel burn» type defect, but has its distinctive features: 1. “Squat” type defect development requires several months in comparison to the «Wheel burn» which appears immediately. 2. “Squat” type defect is not a pair one which is distinct to the «Wheel burn» that has a pair on the neighbouring rail.
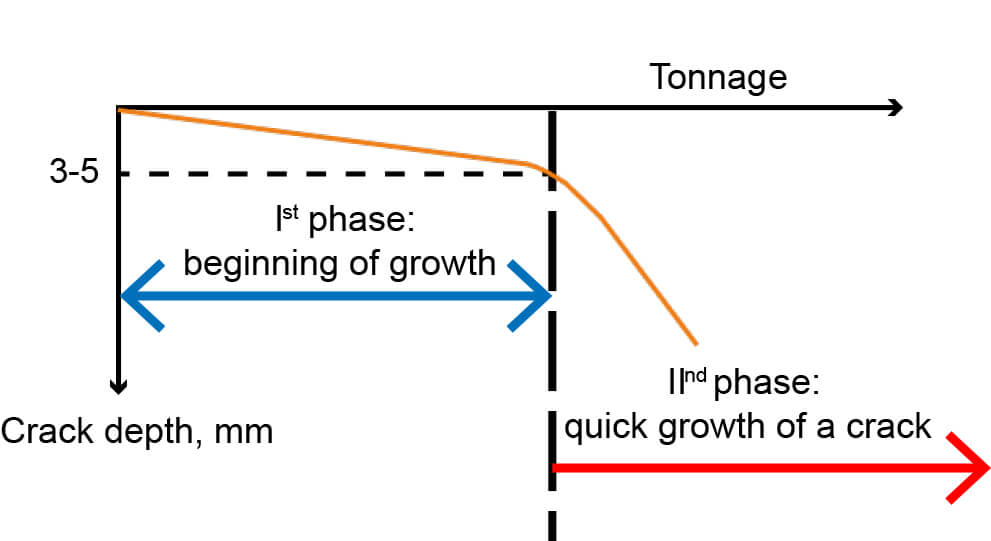
HC defects can occur on any track segment, even on the weld joints. However, most frequently these can be observed in the curves with insufficient external rail gradient. HC growth is facilitated when water or couplant are in contact with the damaged area. HC micro-crack growth can be split in two phases–primary phase of a slow growth, when a crack depth does not exceed 3-5 mm, and length–20 mm, and a quick growth phase causing a rail breakage. (see Fig. 1).
In the UIC 712 R rail track defects classifier the above defects are designated as follows: «squats» (cracks and local depressions on the rail head running surface)–a defect with a code «227» and «head checking» (singular or group defects on the rail on the rail gauge face in the form of small parallel cracks)–with a code «2223».

Figure 2 — Squat (a and b) and Head Checking (c) type defects
-
Ultrasonic methods and sounding schemes for rails on the European railways, Head Checking (HC) type defects detection problems
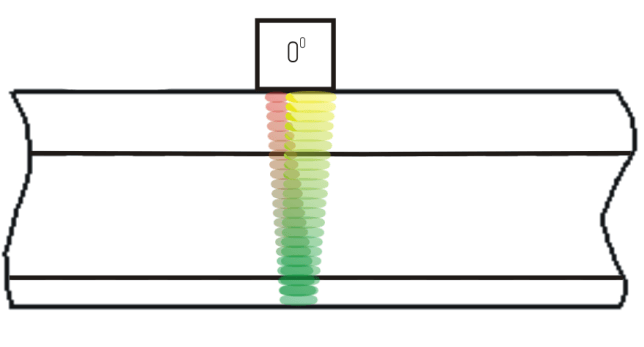
(a) Echo and echo-shadow testing techniques with 2.5 MHz straight-beam probe
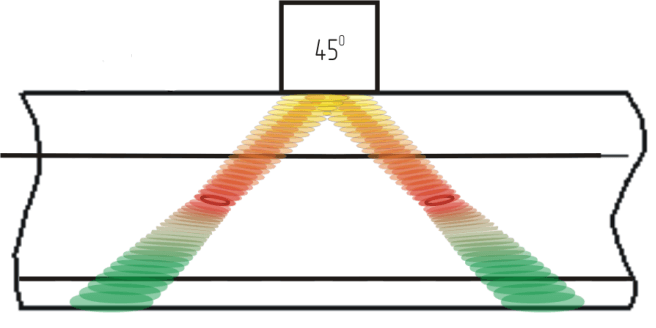
(b) Echo technique with 45 deg. probe forward and backward
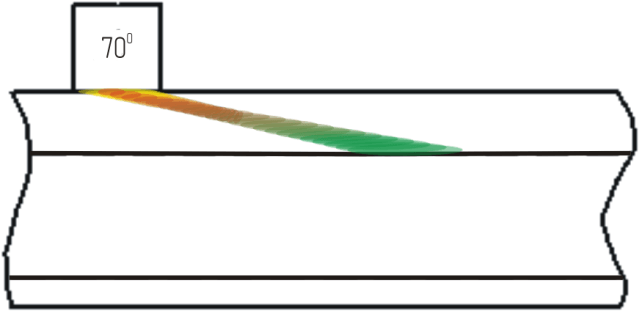
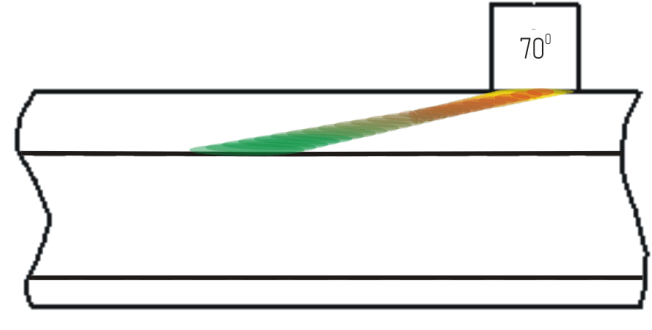
(c) Echo-technique with 70 deg. probe forward and backward
Figure 3 — Sounding schemes according to EN 16729-1:2016
On the European railways, both the high-speed testing systems for rails laid down in the track (scanning speed starts from 40 km/h and more), and portable/mechanised single- and double rail inspection trolleys (scanning speed does not exceed 4 km/h) are applied. In such systems, the classical sounding schemes are implemented, in accordance with EN 16729-1:2016 Railway applications. Infrastructure. Non-destructive testing on rails in track. Requirements for ultrasonic inspection and evaluation principles.
The testing is performed with the following probes: 1 dual element transducer of 4 МHz 0°, 2 single element transducers of 2 МHz ±70°, and 2 single element transducers of 2 МHz ±45°. The probes for scanning are placed in the central part of the rail head. Such sounding scheme allows for the reliable defects detection with a code 227—“Squat”, located in the rail head running surface centre–with 0° and 70° probes. Regarding the HC and “Squat” defects types, off-centered to the gauge face side, these can be detected only at a stage when one of the cracks is developed so that it extended to the rail central crossection–i. e. when there is a threaten of a rail breakage.
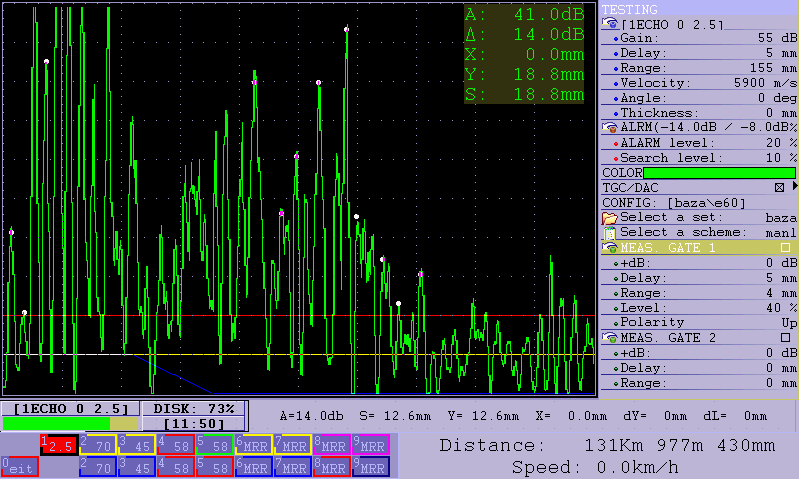
а) А-Scan (with 0°probe)
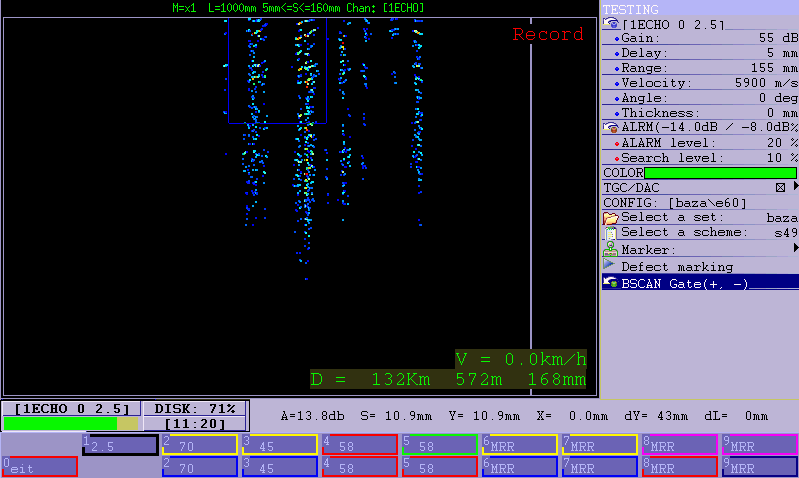
b) B-Scan (with 0° probe)
Figure 4 — Squat defect, B-Scan and А-Scan
The above rail sounding schemes do not allow to detect neither head checks nor defects of a transverse cracks at their early stage of development (i. е. when a crack starts developing on the side face (RCF region)).
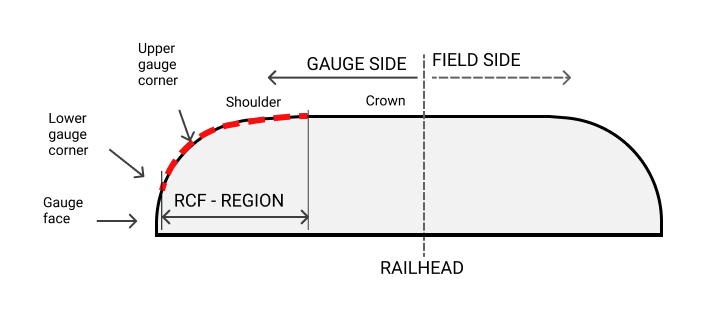
Figure 5 — HC development zone
UDS2-77 - ultrasonic flaw detector for testing
the condition of one rail
Explore More
-
Specialised sounding schemes for the HC detection
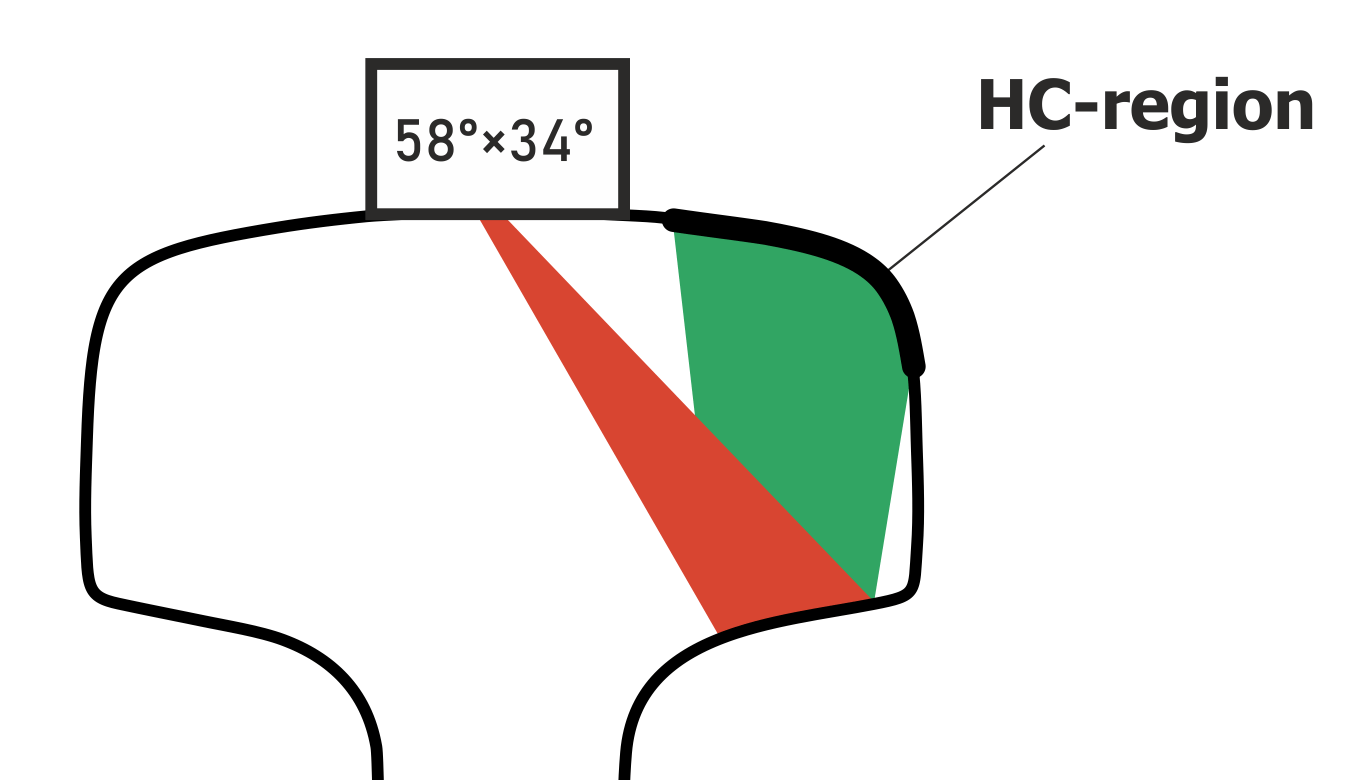
Figure 6 — HC location zone, sounding scheme with 58° probe angle and ±34° angular orientation
Let’s dwell upon the issues of identification of the rail segments that are damaged by 2223 code (HC) defects. These defects represent quite a serious threaten as they can develop into transverse cracks, that in turn can lead to the rail breakage. The optimal rail HC testing method which would enable to detect rail damages at their early phases of development and give reliable data on the measured length, depth and positioning of the cracks in the rail head. Such kind of unified NDT method is still to be invented. In practice, several methods of detection are combined in order to increase the probability of the defects detection at early stages.
For nowadays, for HC revealing, it is recommended to provide a visual inspection, apply optic systems with photo and video cameras, ultrasonic testing with special probes application, and eddy current testing (EC).
Visual inspection is usually accompanied with the pictures and video materials, and is a very resource-taking method, besides, it is subjected to the human factor that result in missing singular or group HC which occupies a short segments.
In order to resolve HC detection issue, our company applied a special probe with 58° probe angle, and ±34° angular orientation relative to the rail longitudinal axis. Such probe is implemented in single rail flaw detector UDS2-77 and double rail flaw detector UDS2-73 scanners. That enables testing of the field faces of the rail head. Considering a rail head configuration this sounding scheme also can be applied for testing of the rail head top radius (RCF-Region, see Fig. 5).
As it can be seen from the Figure 6, acoustic wave is reflected from the plane of the rail fillet, and scans the RCF-Region, where HC are mainly located, which at their early phase of development (<1 мм) for acoustic wave are close to the corner reflector. Thus, 58°×34° probe detects HC with aplomb, and according to the B-Scan data (see Fig. 7) rail HC-damaged area length can be analysed and assessed as well.
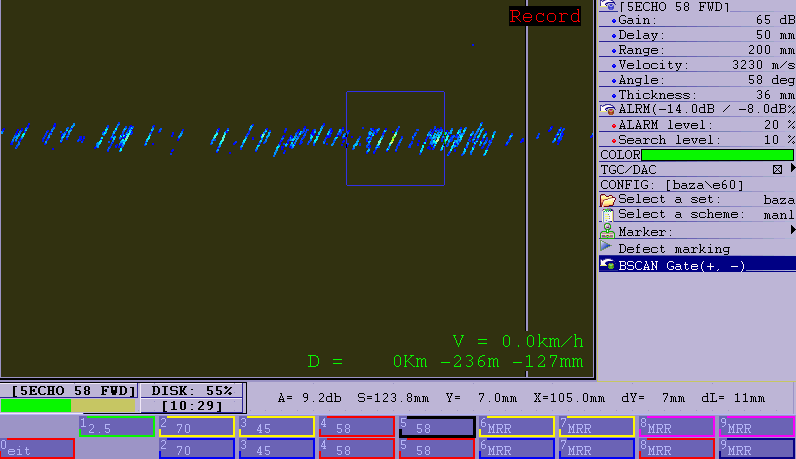
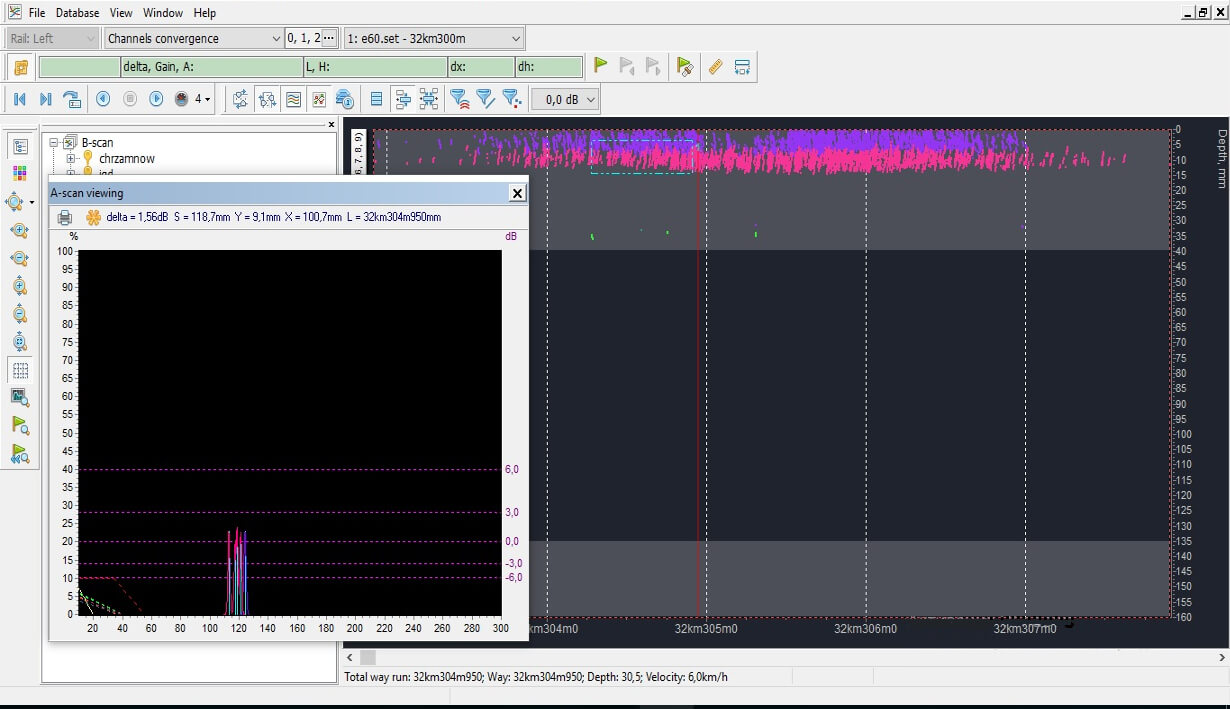
Figure 7 — «Head checking» type defects display on B-Scan
After a long period of use of the described probe, and taking into account the testing technology by portable flaw detectors, and considering the HC direction of development (defects are directed against movement of trains), 58°×34° probe modernisation was conducted, namely— the probe case was designed in such a way that 4 piezoelectric elements are placed inside and directed to the field faces of the rail head along and against the trolley movement (forward and backward) (see Figure 8).
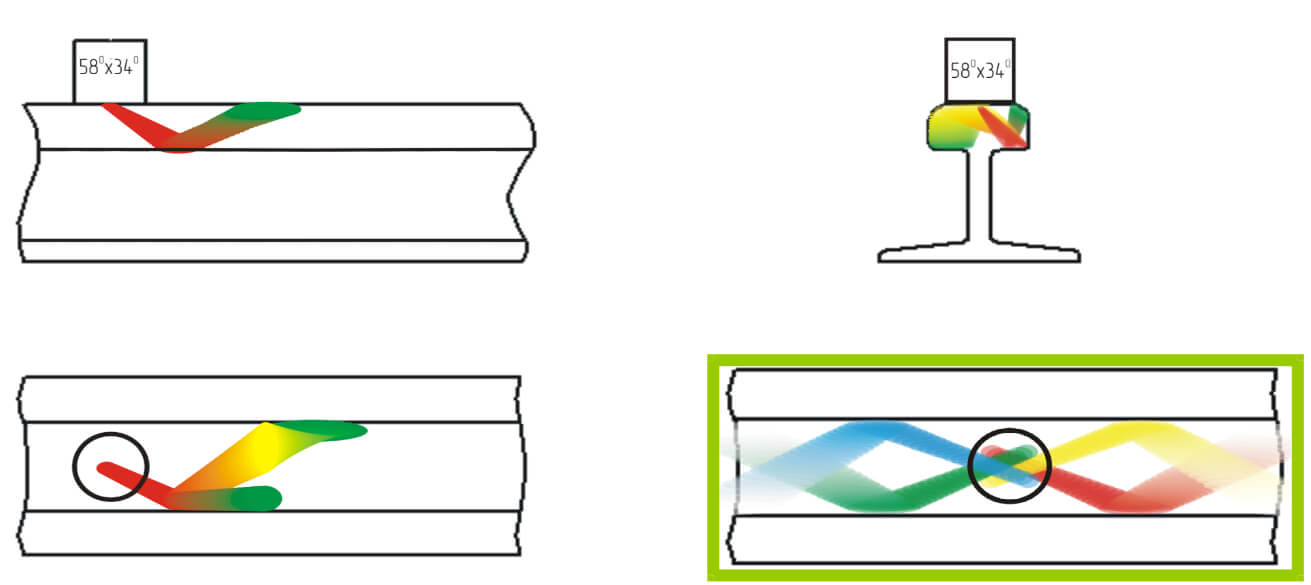
Figure 8 — Complete sounding scheme with 58° probe and ±34° angular orientation
It is worth mentioning, that it is possible to detect only «head checking» containing area of a rail with 58° probe angle and ±34° angular orientation ultrasonic probe. These cracks parameters measurements, such as depth, length are possible only by the eddy current testing method, namely using the single rail eddy current flaw detector ETS-77.
-
Conclusion
As we can conclude after having performed the analysis, standard sounding EN 16729-1:2016 compliant schemes are not effective for Head Checking and cracks of RCF-Region detection at early stages of their development. Reliable detection of HC and cracks in the RCF-Region is assured by custom-made sounding schemes implemented in the railway track inspection trolleys UDS2-77 (for one rail line) and UDS2-73 (for two rail lines) . Depth and length gauging of the cracks is possible only through the eddy current method application using the eddy current single rail flaw detector ETS-77.


